In this tutorial, you will create AWS CloudFormation templates to build a serverless web application using AWS lambda, Amazon API Gateway, Amazon DynamoDB, Amazon Cognito and AWS Amplify. This application enables users to request rides from the Wild Rydes fleet. The application will present users with an HTML-based user interface for indicating the location where they would like to be picked up and will interact with a RESTful web service on the backend to submit the request and dispatch a nearby unicorn. The application will also provide facilities for users to register with the service and log in before requesting rides.
AWS has already provided a great step-by-step tutorial on this web application setup using AWS management console. I have modified this tutorial as follows:
- using CloudFormation template instead of AWS management console
- instead of using AWS CodeCommit, I am using GitHub.
- Additionally, instead of using AWS Access Key ID and Secret Access Key to connect GitHub with AWS Services, I have set up OIDC provider for GitHub, and additionally set up a GitHub action to test the connection from GitHub to AWS when there is a push or pull.
AWS Services Used:
- AWS CLI
- AWS Lambda
- Amazon API Gateway
- AWS Amplify
- Amazon DynamoDB
- Amazon Cognito
- AWS CloudTrail
- AWS CloudWatch
In addition to the above AWS services, we will also be using ARCGIS for maps and GitHub for managing source code.
Prerequisites
- Create AWS account and IAM user in the IAM Identity center
- AWS CLI is installed
- An account with ARCGIS. I signed up for a 21 day free trial
- Git is installed
This tutorial has the same modules and steps as the AWS tutorial so you can follow along easily.
- Module 1: Host a static website with continuous deployment
- Module 2: Manage UsersModule 2: Manage Users
- Module 3: Serverless Service Backend
- Module 4: Deploy a RESTful API
- Module 5: Resource Cleanup
Module 1: Host a static website with continuous deployment
Step 1: Create a repo on GitHub and clone to your local directory
Create your git repository on GitHub and name it wildrydes-site
On your machine, create a folder with the same name and then run the following commands on your terminal to connect to your GitHub repo
echo "# wildrydes-site-repo" >> README.md
git init
git add README.md
git commit -m "first commit"
git branch -M main
git remote add origin https://github.com/maghilda/testrepo.git
git push -u origin main
Step 2: Populate the git repository
cd /Users/maghilda/Documents/GitHub/wildrydes-site/
aws s3 cp s3://wildrydes-us-east-1/WebApplication/1_StaticWebHosting/website ./ --recursive
Once your local system is populated with all the files, push commits to the remote repository on GitHub
git add .
git commit -m 'new files’
git push -u origin main
Step 3: Set up OIDC and GitHub Actions
If you configure an OpenID Connect (OIDC) identity provider (IdP) inside an AWS account, you can use IAM roles and short-term credentials, which removes the need for IAM user access keys. Using long-term credentials requires you to create IAM users and secure the access keys to prevent their disclosure. A better approach is to use GitHub’s support for OpenID Connect to authenticate using an IAM role to generate temporary security credentials. This template will perform the following actions
- Create an OIDC provider for GitHub
- Create an IAM role and scope the trust policy
- Define TrustPolicy for GitHub and Amplify
Obtain GitHub thumbprint and replace the below thumbprint if it has changed.
Refer: https://docs.aws.amazon.com/IAM/latest/UserGuide/id_roles_providers_create_oidc_verify-thumbprint.html
CloudFormation Template for OIDC and GitHub Actions
AWSTemplateFormatVersion: 2010-09-09
Description: test OIDC and GitHub actions

Parameters:

  GithubActionsThumbprint:
    Type: CommaDelimitedList
    Default: 1b511abead59c6ce207077c0bf0e0043b1382612

  AudienceList:
    Type: CommaDelimitedList
    Default: sts.amazonaws.com

  SubjectClaimFilters:
    Type: CommaDelimitedList
    Default: "repo:maghilda/wildrydes-site:ref:refs/heads/main"  #replace with your repo url

Metadata:
  AWS::CloudFormation::Interface:
    ParameterGroups:
      - Label:
          default: "GitHub Action Info"
        Parameters:
          - SubjectClaimFilters
          - GithubActionsThumbprint
          - AudienceList
      - Label:
          default: "AWS IAM Info"
        Parameters:
          - Path
          - PermissionsBoundaryARN
          - ManagedPolicyARNs

Resources:
  GitHubIdentityProvider:
    Type: AWS::IAM::OIDCProvider
    Properties:
      Url: https://token.actions.githubusercontent.com #URL of the GitHub OIDC IdP
      ThumbprintList: !Ref GithubActionsThumbprint
      ClientIdList: !Ref AudienceList
  GitHubActionAssumeRoleWithAction:
    Type: AWS::IAM::Role
    Properties:
      Description: Service Role for use in GitHub Actions
      AssumeRolePolicyDocument:
        Version: "2012-10-17"
        Statement:
          - Sid: RoleForGitHubActions #for github to work
            Effect: Allow
            Principal:
              Federated: !GetAtt GitHubIdentityProvider.Arn
            Action:
              - "sts:AssumeRoleWithWebIdentity"
            Condition:
              StringEquals:
                "token.actions.githubusercontent.com:aud": !Ref AudienceList
              StringLike:
                "token.actions.githubusercontent.com:sub": !Ref SubjectClaimFilters
          - Sid: RoleForAmplify     #for amplify to work
            Effect: Allow
            Principal:
              Service: amplify.amazonaws.com
            Action: sts:AssumeRole

Outputs:
  ServiceRoleARN:
    Description: arn of service role for use in GitHub actions
    Value: !GetAtt GitHubActionAssumeRoleWithAction.Arn
Save the above template as github-actions-oidc-template.yml and create the stack from your terminal
aws cloudformation create-stack --stack-name testoidc --template-body file://github-actions-oidc-template.yml --capabilities CAPABILITY_IAMaws cloudformation describe-stacks --stack-name testoidcOUTPUT:
aws cloudformation describe-stacks --stack-name testoidc
{
"Stacks": [
{
"StackId": "arn:aws:cloudformation:us-east-1:123456789012:stack/testoidc/5d9295c0-ace5-11ee-94ec-0ea1c2170c63",
"StackName": "testoidc",
"Parameters": [
{
"ParameterKey": "GithubActionsThumbprint",
"ParameterValue": "1b511abead59c6ce207077c0bf0e0043b1382612"
},
{
"ParameterKey": "AudienceList",
"ParameterValue": "sts.amazonaws.com"
},
{
"ParameterKey": "SubjectClaimFilters",
"ParameterValue": "repo:maghilda/wildrydes-site:ref:refs/heads/main"
}
],
"CreationTime": "2024-01-06T22:46:01.300000+00:00",
"RollbackConfiguration": {},
"StackStatus": "CREATE_COMPLETE",
"DisableRollback": false,
"NotificationARNs": [],
"Capabilities": [
"CAPABILITY_IAM"
],
"Outputs": [
{
"OutputKey": "ServiceRoleARN",
"OutputValue": "arn:aws:iam::123456789012:role/testoidc-GitHubActionAssumeRoleWithAction-yEDYZNzTDIxw",
"Description": "arn of service role for use in GitHub actions"
}
],
"Tags": [],
"EnableTerminationProtection": false,
"DriftInformation": {
"StackDriftStatus": "NOT_CHECKED"
}
}
]
}On successful completion, note the ARN of the AWS GitHubAction role in the output.
Step 4: Create a GitHub action
GitHub actions are defined as methods that you can use to automate, customize, and run your software development workflows in GitHub.
- On your new repo on GitHub, click Actions and under Get Started with GitHub Actions, click set up a workflow yourself
- You can keep the default main.yml file name. The structure will look like this wildrydes-site/.github/workflows/main.yml in main
- Add the following basic workflow to the file
- Replace the role arn with your role
- Commit changes
Refer: https://aws.amazon.com/blogs/security/use-iam-roles-to-connect-github-actions-to-actions-in-aws/
# This is a basic workflow to help you get started with Actions
name:Connect to an AWS role from a GitHub repository

# Controls when the action will run. Invokes the workflow on push events but only for the main branch
on:
  push:
    branches: [ main ]
  pull_request:
    branches: [ main ]

env:

  AWS_REGION : <"us-east-1"> #Change to reflect your Region

# Permission can be added at job level or workflow level
permissions:
      id-token: write   # This is required for requesting the JWT
      contents: read    # This is required for actions/checkout
jobs:
  AssumeRoleAndCallIdentity:
    runs-on: ubuntu-latest
    steps:
      - name: Git clone the repository
        uses: actions/checkout@v3
      - name: configure aws credentials
        uses: aws-actions/configure-aws-credentials@v1.7.0
        with:
          role-to-assume: <arn:aws:iam::111122223333:role/GitHubAction-AssumeRoleWithAction> #change to reflect your IAM role’s ARN
          role-session-name: GitHub_to_AWS_via_FederatedOIDC
          aws-region: ${{ env.AWS_REGION }}
      # Hello from AWS: WhoAmI
      - name: Sts GetCallerIdentity
        run: |
          aws sts get-caller-identity
Step 5: Validate your implementation
If there is a push or pull on the repository’s “main” branch, the GitHub action that you just created will be invoked.
To test your workflow,
- On your local machine, navigate to the the wildrydes-site folder and open the index.html file.
- Modify the title line with the following text: <title>Wild Rydes – Rydes of the Future!</title>
- Save the file.
- In your terminal window, add, commit your change, and push the change to the git repository again.
git add .
git commit -m 'test GitHub actions’
git push -u origin main
Under your GitHub repo, in the Actions tab, you will see if your workflow ran successfully.
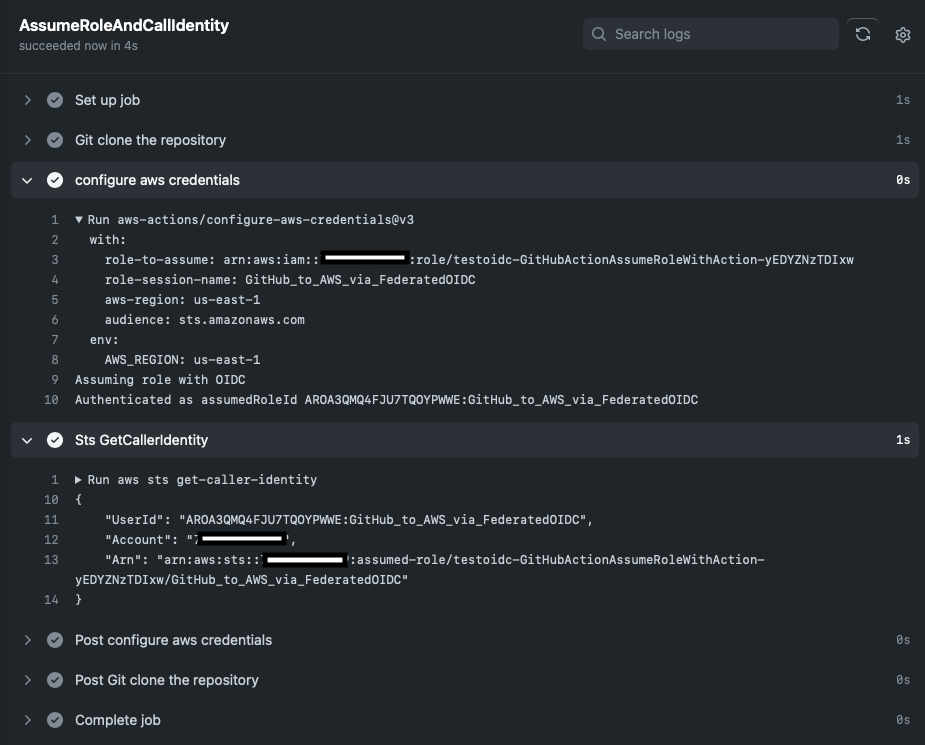
Audit the role’s use with Amazon CloudTrail logs. Once you have validated the GitHub connection, you can remove the workflow as it is not longer needed for the rest of the tutorial.
Step 6: Host the website with AWS Amplify
Amplify Console provides a git-based workflow for continuous deployment and hosting of the static web resources including HTML, CSS, JavaScript, and image files which are loaded in the user’s browser.
Before deploying the website, make sure you provide Amplify access to GitHub repositories by following the steps in AWS document.
Refer: https://docs.aws.amazon.com/amplify/latest/userguide/setting-up-GitHub-access.html#setting-up-github-app-cloudformation
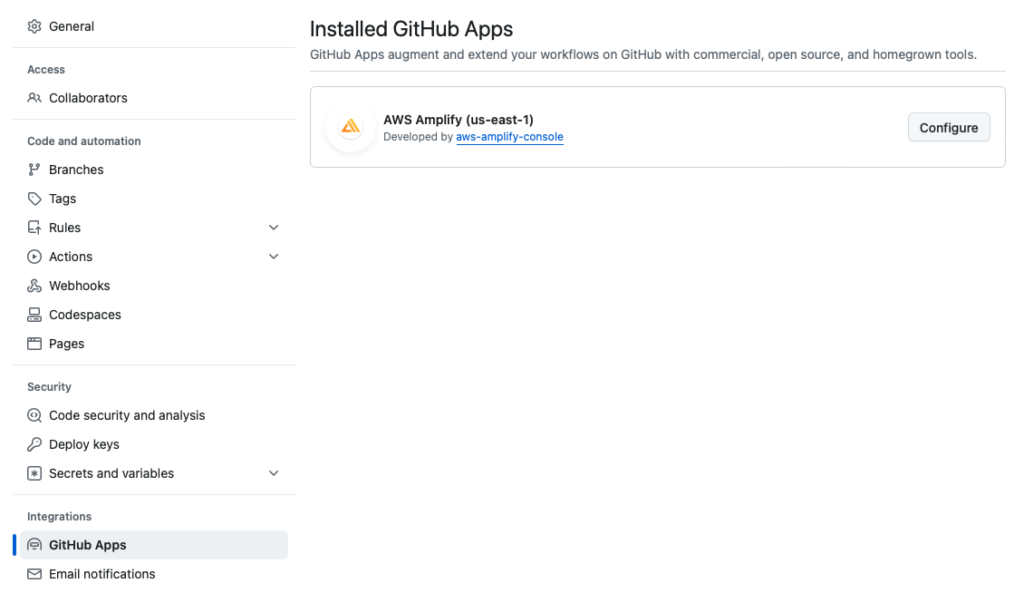
Now deploy the website you’ve just committed to git via the CloudFormation template.
CloudFormation Template for AWS Amplify
AWSTemplateFormatVersion: 2010-09-09
Description: test amplify

Parameters:

  accessToken:
    Type: String
    Default: ghp_atxHHFEKEFKEFK:DDKDP1NnD8   #replace with your GitHub personal token

Resources:
  AWSAmplify:
    Type: AWS::Amplify::App
    Properties:
      AccessToken: !Ref accessToken
      BuildSpec: |
         version: 1
         frontend:
            phases:
              # IMPORTANT - Please verify your build commands
              build:
                commands: []
            artifacts:
              # IMPORTANT - Please verify your build output directory
              baseDirectory: /
              files:
                - '**/*'
            cache:
              paths: []
      Description: test amplify
      EnableBranchAutoDeletion: false
      IAMServiceRole: "arn:aws:iam::123456789012:role/testoidc-GitHubActionAssumeRoleWithAction-yEDYZNzTDIxw"
      Name: WildRydesApp
      Platform: WEB
      Repository: "https://github.com/maghilda/wildrydes-site"

  AmplifyBranch:
    Type: AWS::Amplify::Branch
    Properties:
      BranchName: main
      AppId: !GetAtt AWSAmplify.AppId
      Description: Main Branch
      EnableAutoBuild: true
      Framework: Web
      Stage: PRODUCTION

Outputs:
  DefaultDomain:
    Value: !GetAtt AWSAmplify.DefaultDomain
  MyAppId:
    Value: !GetAtt AWSAmplify.AppId
Save the above template as amplify-template.yml and create the stack from your terminal
aws cloudformation create-stack --stack-name testamplify --template-body file://amplify-template.yml --capabilities CAPABILITY_IAMaws cloudformation describe-stacks --stack-name testamplifyStep 7: Validate your website
- On your local machine, navigate to the the wildrydes-site folder and open the index.html file.
- Modify the title line with the following text: <title>Wild Rydes – Something new !</title>
- Save the file.
- In your terminal window, add, commit your change, and push the change to the git repository again.
git add .
git commit -m 'test amplify’
git push -u origin main
As soon as you commit changes to GitHub repo, Amplify will start to provision->build->deploy your website. Once Amplify has completed the deployment, open the Wild Rydes site from the link on the Amplify console and notice the tab title change.
Module 2: Manage Users
Step 1: Create Amazon Cognito user pool
This template will perform the following actions:
- Create Amazon Cognito user pool
- Integrate your website with the user pool
AWSTemplateFormatVersion: 2010-09-09
Description: test cognito userpools

Parameters:

  userPoolName:
    Type: String
    Default: WildRydes

  userPoolClientName:
    Type: String
    Default: WildRydesWebApp

  usernameAttributes:
    Type: CommaDelimitedList
    Default: email

  autoVerifiedAttributes:
    Type: CommaDelimitedList
    Default: email

  mfaConfiguration:
    Type: String
    Default: "OFF"

  passwordPolicyMinLength:
    Type: Number
    Default: 8

Resources:
# BEGIN USER POOL RESOURCES
  UserPool:
    Type: AWS::Cognito::UserPool
    Properties:
      UserPoolName: !Ref userPoolName
      Schema:
        - Name: email
          Required: true
          Mutable: true
      AutoVerifiedAttributes: !Ref autoVerifiedAttributes
      Policies:
        PasswordPolicy:
          MinimumLength: !Ref passwordPolicyMinLength
          RequireLowercase: true
          RequireNumbers: true
          RequireSymbols: true
          RequireUppercase: true
      MfaConfiguration: !Ref mfaConfiguration
      EmailConfiguration:
          EmailSendingAccount: COGNITO_DEFAULT

# BEGIN USER POOL CLIENT RESOURCES
  UserPoolClient:
    Type: AWS::Cognito::UserPoolClient
    Properties:
      UserPoolId: !Ref UserPool
      ClientName: !Ref userPoolClientName

Outputs :
  UserPoolId:
    Value: !Ref UserPool
    Description:  Id for the user pool

  AppClientID:
    Value: !Ref UserPoolClient
Save the above template as userpool-template.yml and create the stack from your terminal
aws cloudformation create-stack --stack-name testuserpool --template-body file://userpool-template.ymlNote the user pool id and client id for the next step
Step 2: Update the config file
The js/config.js file contains settings for the user pool ID, app client ID and Region. Update this file with the settings from the user pool and app you created in the previous step. Save, add, commit, and push the file to your Git repository to have it automatically deploy to Amplify Console.
git add .
git commit -m 'test userpools’
git push -u origin main
Step 3: Validate your implementation
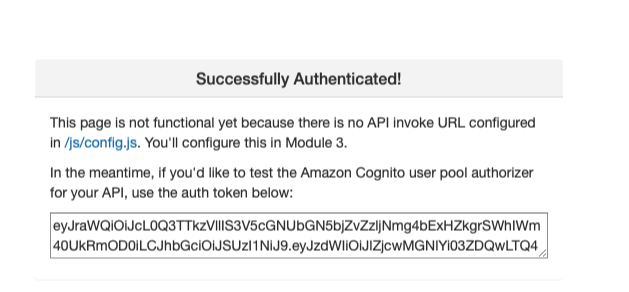
Once the Amplify deploy is complete, launch your website and register for a user. You should receive a verification code to complete the registration process. If successful you should be redirected to /ride.html and you should see the auth token. Save the auth token in order to create the Amazon Cognito user pool authorizer in the next module.
Module 3: Serverless Service Backend
Step 1: Create an Amazon DynamoDB table
AWSTemplateFormatVersion: 2010-09-09
Description: test dynamodb

Parameters:
  mTableName:
    Type: String
    Default: Rides

  billingMode:
    Type: String
    Default: PAY_PER_REQUEST

Resources:
  # BEGIN DYNAMODB RESOURCES
  MyDynamoDB:
    Type: AWS::DynamoDB::Table
    Properties:
      AttributeDefinitions:
        - AttributeName: "RideId"
          AttributeType: "S"
      KeySchema:
        - AttributeName: "RideId"
          KeyType: "HASH"
      TableName: !Ref mTableName
      BillingMode: !Ref billingMode

Outputs :
  DynamodDB:
    Value: !Ref MyDynamoDB

  DynamoDBArn:
    Value: !GetAtt MyDynamoDB.Arn
Save the above template as dynamodb-template.yml and create the stack from your terminal
aws cloudformation create-stack --stack-name testdynamodb --template-body file://dynamodb-template.ymlaws dynamodb list-tablesaws dynamodb describe-table --table-name Rides Step 2: Create a Lambda function for handling requests
Copy the Lambda function in the AWS tutorial into a new file requestUnicorn.js in your wildrydes-site project. Then zip the file as follows:
zip requestUnicorn.zip requestUnicorn.jsCreate a S3 bucket m-lambdafunctions and upload requestUnicorn.zip to this bucket
Step 3: Create an IAM role for your Lambda function and add permissions
AWSTemplateFormatVersion: 2010-09-09
Description: test lambda function

Resources:
  # BEGIN MANAGED POLICY
  ManagedPolicy:
    Type: AWS::IAM::ManagedPolicy
    Properties:
      PolicyDocument:
        Version: '2012-10-17'
        Statement:
          - Sid: CloudWatchLogs #similar to AWSLambdaBasicExecutionRole
            Effect: Allow
            Action:
              - logs:PutLogEvents
              - logs:CreateLogGroup
              - logs:CreateLogStream
            Resource: "arn:aws:logs:*:*:*"
          - Sid: DynamoDBAccess
            Effect: Allow
            Action: dynamodb:PutItem
            Resource: "arn:aws:dynamodb:us-east-1:123456789012:table/Rides" #replace with your account id
  # BEGIN LAMBDA IAM RESOURCES
  WildRydesLambdaRole:
    Type: 'AWS::IAM::Role'
    Properties:
      AssumeRolePolicyDocument:
        Version: '2012-10-17'
        Statement:
          - Effect: Allow
            Principal:
              Service:
                - lambda.amazonaws.com
            Action:
              - 'sts:AssumeRole'
      ManagedPolicyArns:
          - !Ref ManagedPolicy

  myLambdaFunction:
    Type: AWS::Lambda::Function
    Properties:
      FunctionName: RequestUnicorn
      Runtime: nodejs16.x
      Role: !GetAtt WildRydesLambdaRole.Arn
      Handler: requestUnicorn.handler #filename.handler
      Code:
        S3Bucket: m-lambdafunctions  #s3 bucket name
        S3Key: requestUnicorn.zip   #file uploaded to the s3 bucket
      Description: test my lambda function
      TracingConfig:
        Mode: Active

Outputs :
  LambdaFunctionName:
    Value: !Ref myLambdaFunction

  LambdaRoleArn:
    Value: !GetAtt WildRydesLambdaRole.Arn
Save the above template as lambda-template.yml and create the stack from your terminal
aws cloudformation create-stack \
  --stack-name testlambda \
  --capabilities CAPABILITY_NAMED_IAM \
  --template-body file://lambda-template.yml
Step 4: Validate your implementation
Follow the test procedures in AWS tutorial. The output should look like this
{
  "statusCode": 201,
  "body": "{\"RideId\":\"ryvBjGAhp-5jZJOe27Txig\",\"Unicorn\":{\"Name\":\"Angel\",\"Color\":\"White\",\"Gender\":\"Female\"},\"Eta\":\"30 seconds\",\"Rider\":\"the_username\"}",
  "headers": {
    "Access-Control-Allow-Origin": "*"
  }
}
Module 4: Deploy a RESTful API
Step 1: Create a new REST API
API Gateway will be the trigger for the lambda function (just like we had s3 trigger in the previous tutorial) when the user requests a ride. The following template will perform these steps:
- Create a new API
- Create authorizer
- Create a resource
- Create a method
- Deploy the API
AWSTemplateFormatVersion: 2010-09-09
Description: test API Gateway

Parameters:
  apiName:
    Type: String
    Default: WildRydes

  endPointType:
    Type: String
    Default: "EDGE"

  roleArn:
    Type: String
    Default: "arn:aws:iam::123456789012:role/testlambda-WildRydesLambdaRole-JvCwTpjGxiCi" #replace with your role arn

  authorizerName:
    Type: String
    Default: WildRydes

  providerCognitoARN:
    Type: String
    Default: "arn:aws:cognito-idp:us-east-1:123456789012:userpool/us-east-1_4qA0ngoIL" #replace with your userpool arn

  authorizerType:
    Type: String
    Default: COGNITO_USER_POOLS

  pathPart:
    Type: String
    Default: ride

  functionArn:
    Type: String
    Default: "arn:aws:lambda:us-east-1:123456789012:function:RequestUnicorn"


  uri:
    Type: String
    Default: "arn:aws:apigateway:us-east-1:lambda:path/2015-03-31/functions/arn:aws:lambda:us-east-1:123456789012:function:RequestUnicorn/invocations"

Resources:
  RestApi:
    Type: AWS::ApiGateway::RestApi
    Properties:
      ApiKeySourceType: AUTHORIZER
      EndpointConfiguration:
        Types:
        - !Ref endPointType
      Name: !Ref apiName

  RestApiAuthorizer:
    Type: AWS::ApiGateway::Authorizer
    Properties:
      AuthorizerCredentials: !Ref roleArn
      IdentitySource: method.request.header.authorization
      Name: !Ref authorizerName
      ProviderARNs:
        - !Ref providerCognitoARN
      RestApiId: !Ref RestApi
      Type: !Ref authorizerType

  RestApiResource:
    Type: AWS::ApiGateway::Resource
    Properties:
      ParentId: !GetAtt RestApi.RootResourceId
      PathPart: !Ref pathPart
      RestApiId: !Ref RestApi

  RestApiMethod:
    Type: AWS::ApiGateway::Method
    DependsOn:
      - LambdaApiPerms
    Properties:
      ApiKeyRequired: false
      AuthorizationType: !Ref authorizerType
      AuthorizerId: !Ref RestApiAuthorizer
      HttpMethod: POST
      Integration:
        IntegrationHttpMethod: POST
        Type: AWS_PROXY   #Use Lambda Proxy integration
        Uri: !Ref uri
        RequestTemplates:
          application/json: '{"statusCode": 200}'
        IntegrationResponses:
          - ResponseTemplates:
              application/json: "{\"message\": \"Hello from API gateway\"}"
            StatusCode: 200
        PassthroughBehavior: WHEN_NO_TEMPLATES
      MethodResponses:
        - ResponseModels:
            application/json: 'Empty'
          StatusCode: 200
      ResourceId: !Ref RestApiResource
      RestApiId: !Ref RestApi

  #Enable API Gateway CORS
  OptionsMethod:
    Type: AWS::ApiGateway::Method
    Properties:
      AuthorizationType: NONE
      ResourceId: !Ref RestApiResource
      RestApiId: !Ref RestApi
      HttpMethod: OPTIONS
      Integration:
        IntegrationResponses:
          - StatusCode: 200
            ResponseParameters:
              method.response.header.Access-Control-Allow-Headers: "'Content-Type,X-Amz-Date,Authorization,X-Api-Key,X-Amz-Security-Token'"
              method.response.header.Access-Control-Allow-Methods: "'POST,OPTIONS'"
              method.response.header.Access-Control-Allow-Origin: "'*'"
            ResponseTemplates:
              application/json: ''
        PassthroughBehavior: WHEN_NO_MATCH
        RequestTemplates:
          application/json: '{"statusCode": 200}'
        Type: MOCK
      MethodResponses:
        - StatusCode: 200
          ResponseModels:
            application/json: 'Empty'
          ResponseParameters:
            method.response.header.Access-Control-Allow-Headers: false
            method.response.header.Access-Control-Allow-Methods: false
            method.response.header.Access-Control-Allow-Origin: false

  LambdaApiPerms:
    Type: AWS::Lambda::Permission
    Properties:
      Action: lambda:InvokeFunction
      FunctionName: !Ref functionArn
      Principal: apigateway.amazonaws.com
      SourceArn:
        !Join
        - ''
        - - 'arn:'
          - !Ref AWS::Partition
          - ':execute-api:'
          - !Ref AWS::Region
          - ':'
          - !Ref AWS::AccountId
          - ':'
          - !Ref RestApi
          - /*/*
      SourceAccount: !Ref AWS::AccountId

  RestApiDeployment:
      Type: AWS::ApiGateway::Deployment
      DependsOn:
        - RestApiMethod
      Properties:
        RestApiId: !Ref RestApi
        #StageName: prod

  # Enable logging of all HTTP requests
  ApiStage:
    Type: AWS::ApiGateway::Stage
    Properties:
      DeploymentId: !Ref RestApiDeployment
      MethodSettings:
        - HttpMethod: '*'
          LoggingLevel: INFO
          ResourcePath: /*
          DataTraceEnabled: true
      RestApiId: !Ref RestApi
      StageName: prod

Outputs:
  RestApiId:
    Value: !Ref RestApi

  AuthorizerId:
    Value: !GetAtt RestApiAuthorizer.AuthorizerId

  ApiUrl:
    Description: URL of the REST API.
    Value:
      Fn::Join:
      - ''
      - - https://
        - Ref: RestApi
        - .execute-api.
        - Ref: AWS::Region
        - .
        - Ref: AWS::URLSuffix
        - /prod
Save the above template as apigateway-template.yml and create the stack from your terminal
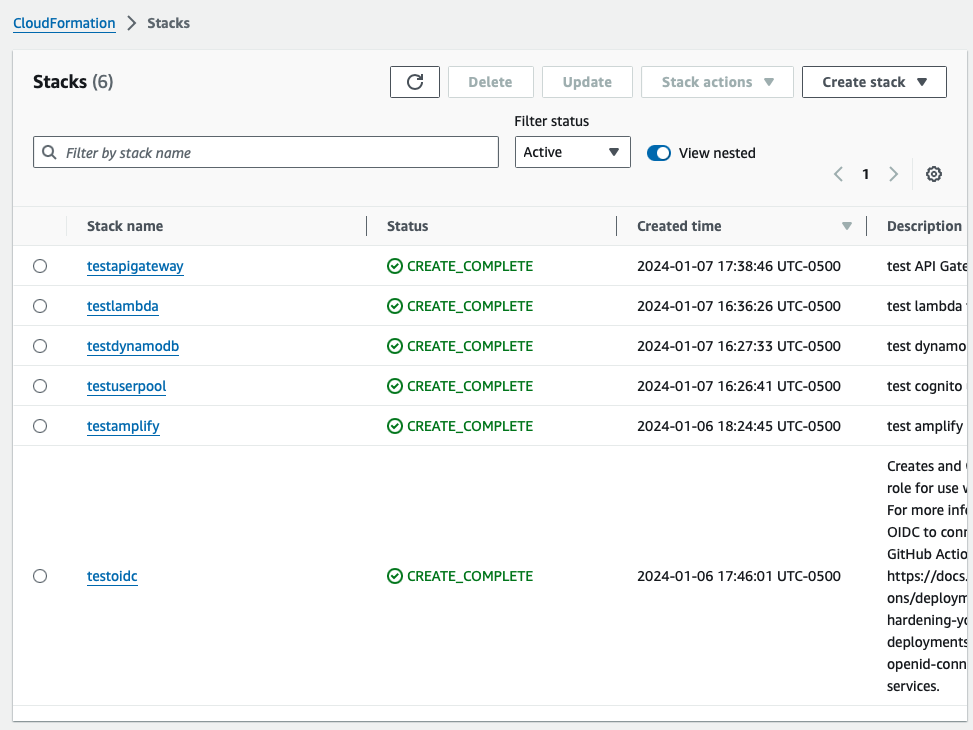
aws cloudformation create-stack --stack-name testapigateway --template-body file://apigateway-template.ymlNote the ApiUrl from the output. At this time, you should have all the stacks successfully completed like the below
Step 2: Update the website config
Update js/config.js file with the invokeUrl in the previous step.
invokeUrl: ‘ ‘ // e.g. https://rc7nyt4tql.execute-api.us-west-2.amazonaws.com/prod’,
Update the ArcGIS version from 4.3 to 4.6 in the ride.html file as specified in the AWS tutorial
Save, add, commit, and push the file to your Git repository to have it automatically deploy to Amplify Console.
git add .
git commit -m 'update configs’
git push -u origin main
Step 3: Validate your implementation
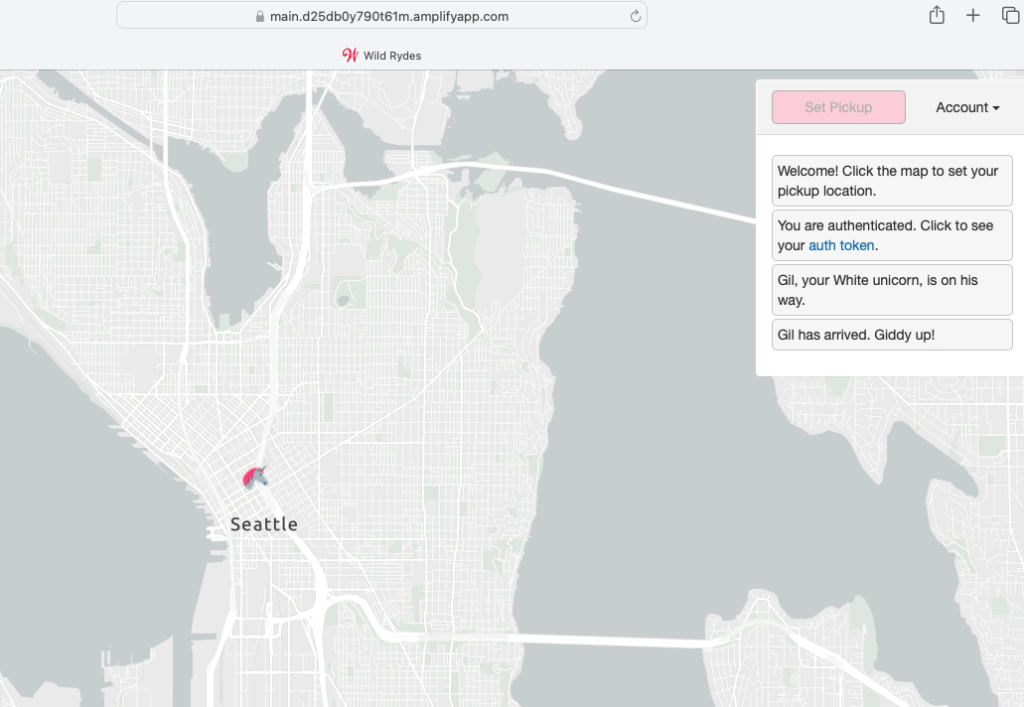
Visit /ride.html under your website domain and click Request Unicorn. You should see a notification in the right sidebar that a unicorn is on its way and then see a unicorn icon fly to your pickup location.
Module 5: Resource Cleanup
Step 1: Delete your app
aws cloudformation delete-stack --stack-name testamplifyStep 2: Delete your Amazon Cognito user pool
aws cloudformation delete-stack --stack-name testuserpoolStep 3: Delete your server less backend
aws cloudformation delete-stack --stack-name testdynamodb
aws cloudformation delete-stack --stack-name testlambda
Step 4: Delete your REST API
aws cloudformation delete-stack --stack-name testapigatewayStep 5: Delete your OIDC provider
aws cloudformation delete-stack --stack-name testoidcStep 6: Delete your CloudWatch Log
aws logs delete-log-group --log-group-name /aws/lambda/RequestUnicornReferences:
- https://aws.amazon.com/getting-started/hands-on/build-serverless-web-app-lambda-apigateway-s3-dynamodb-cognito/?ref=gsrchandson
- https://aws.amazon.com/blogs/security/use-iam-roles-to-connect-github-actions-to-actions-in-aws/
- https://docs.aws.amazon.com/amplify/latest/userguide/custom-domains.html
- https://docs.aws.amazon.com/amplify/latest/userguide/getting-started.html
- https://docs.aws.amazon.com/dtconsole/latest/userguide/connections-create-github.html
- https://aws.amazon.com/blogs/opensource/deploy-aws-cloudformation-stacks-with-github-actions/
- https://www.stephengream.com/http-gateway-with-cognito
This is the end of the tutorial. You can make linked and nested templates but for simplicity and to follow along the AWS tutorial, I created multiple templates. Hope you got something out of it!
