In the previous tutorial, I showed how to use AWS SDK and Python to deploy an existing Lambda function and configure a trigger for an Amazon S3 bucket. In this tutorial, we will repeat the same steps but using AWS CloudFormation template instead of AWS SDK and Python. Every time we add an object to the Amazon S3 bucket, Lambda function runs and outputs the object type to Amazon CloudWatch Logs.
We will re-use the same Python file for the Lambda function and upload the zip file to our S3 bucket. We could have also defined an in-line Lambda function within CloudFormation template but for real world production workloads, defining the functions in a separate Python file is highly recommended for reusability and readability.
AWS Services Used
- AWS CLI
- AWS Management Console
- Amazon CloudWatch Logs
- Amazon S3
- AWS CloudFormation
- AWS Lambda
- AWS IAM
To complete this tutorial, the steps are almost the same as in the previous tutorial but this time using a template file:
- Create IAM permissions policy
- Create IAM execution role for the Lambda function
- Deploy the Lambda function
- Create the S3 trigger
- Define Lambda permissions to allow S3 to invoke the Lambda function
- Create the Stack by uploading the template file
- Test the S3 trigger by uploading a file in the S3 bucket
- Verify CloudWatch logs to see if the Lambda function executed successfully
- Delete the stack to tear down all the resources
A template contains the configuration information about the AWS resources you want to create in the stack. The template is stored as a text file whose format complies with the JavaScript Object Notation (JSON) or YAML standard. Because they are text files, you can create and edit them in any text editor and manage them in your source control system with the rest of your source code. For this tutorial, I am using YAML format and have created and edited the template in Visual Studio Code.
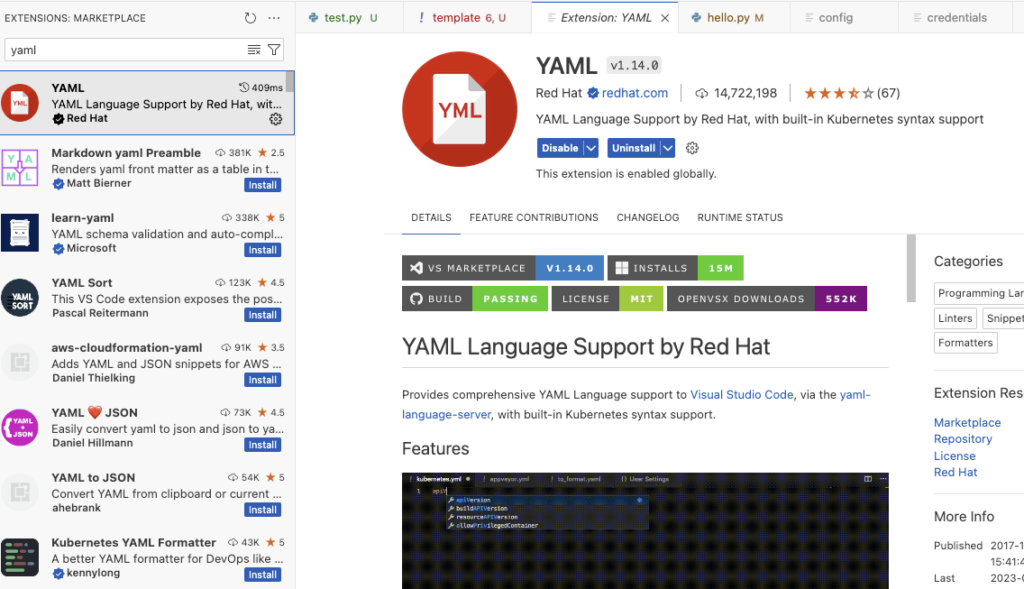
I downloaded the ‘YAML Language Support by RedHat’ extension for Visual Studio Code to create well-formed YAML.
Install YAML Language Support by RedHat for Visual Studio Code
You can download, install, and set up the Python for Visual Studio Code through the VS Code Marketplace in your IDE.
- Click the extensions button on the left navigation bar and then in the Search Extensions in Marketplace, enter YAML.
- Choose Install to begin the installation process.

With the right template, you can deploy all the AWS resources at once for an application. The only required top-level object is the Resources object, which must declare at least one resource.
In this tutorial, you’ll examine a template that declares the resources for a Lambda function with its required permissions, policy and S3 bucket as a trigger. Once the resources are defined, you can create a stack, monitor the stack creation process, examine the resources on the stack, and then delete the stack. You can use the AWS Management Console or AWS CLI to complete these tasks.
Prerequisites
- Set up IAM user in the IAM Identity Center
- Create a bucket to host your function file
- Upload the function.zip file in the above bucket
For instructions, follow the previous tutorial.
Create IAM permissions policy
SampleManagedPolicy:
    Type: AWS::IAM::ManagedPolicy
    Properties:
      PolicyDocument:
        Version: '2012-10-17'
        Statement:
          - Effect: Allow
            Action:
              - logs:PutLogEvents
              - logs:CreateLogGroup
              - logs:CreateLogStream
            Resource: "arn:aws:logs:*:*:*"
          - Effect: Allow
            Action:
            - s3:GetObject
            Resource: "arn:aws:s3:::*/*"
Create IAM execution role
RootRole:
    Type: 'AWS::IAM::Role'
    Properties:
      AssumeRolePolicyDocument:
        Version: '2012-10-17'
        Statement:
          - Effect: Allow
            Principal:
              Service:
                - lambda.amazonaws.com
            Action:
              - 'sts:AssumeRole'
      ManagedPolicyArns:
          - !Ref SampleManagedPolicy
Deploy the Lambda function
DeployLambdafn:
    Type: AWS::Lambda::Function
    Properties:
      Runtime: python3.11
      Role: !GetAtt RootRole.Arn
      Handler: test.lambda_handler
      Code:
        S3Bucket: vibstest  #name of the s3 bucket
        S3Key: function.zip #zip file in the vibstest bucket containing Lambda function
      Description: test my lambda function
      TracingConfig:
        Mode: Active
Create the Amazon S3 trigger
S3Trigger:
    Type: AWS::S3::Bucket
    DependsOn:
        - LambdaPerms
    Properties:
      NotificationConfiguration:
        LambdaConfigurations:
          - Event: s3:ObjectCreated:*
            Function: !GetAtt DeployLambdafn.Arn
Define Lambda permissions to allow S3 to invoke the lambda function
LambdaPerms:
    Type: AWS::Lambda::Permission
    Properties:
      Action: 'lambda:InvokeFunction'
      FunctionName: !Ref DeployLambdafn
      Principal: s3.amazonaws.com
      SourceAccount: !Ref AWS::AccountId
Define the output (optional)
Outputs:
  S3BucketName:
    Description: The name of the bucket created above
    Value: !Ref S3Trigger
Complete Template File (yaml)
AWSTemplateFormatVersion: 2010-09-09
Description: Tutorial- How to use CloudFormation Template
Resources:
  SampleManagedPolicy:
    Type: AWS::IAM::ManagedPolicy
    Properties:
      PolicyDocument:
        Version: '2012-10-17'
        Statement:
          - Effect: Allow
            Action:
              - logs:PutLogEvents
              - logs:CreateLogGroup
              - logs:CreateLogStream
            Resource: "arn:aws:logs:*:*:*"
          - Effect: Allow
            Action:
            - s3:GetObject
            Resource: "arn:aws:s3:::*/*"
  RootRole:
    Type: 'AWS::IAM::Role'
    Properties:
      AssumeRolePolicyDocument:
        Version: '2012-10-17'
        Statement:
          - Effect: Allow
            Principal:
              Service:
                - lambda.amazonaws.com
            Action:
              - 'sts:AssumeRole'
      ManagedPolicyArns:
          - !Ref SampleManagedPolicy
  DeployLambdafn:
    Type: AWS::Lambda::Function
    Properties:
      Runtime: python3.11
      Role: !GetAtt RootRole.Arn
      Handler: test.lambda_handler
      Code:
        S3Bucket: vibstest
        S3Key: function.zip
      Description: test my lambda function
      TracingConfig:
        Mode: Active
  S3Trigger:
    Type: AWS::S3::Bucket
    #BucketName: !Ref S3BucketName
    DependsOn:
        - LambdaPerms
    Properties:
      NotificationConfiguration:
        LambdaConfigurations:
          - Event: s3:ObjectCreated:*
            Function: !GetAtt DeployLambdafn.Arn
  LambdaPerms:
    Type: AWS::Lambda::Permission
    Properties:
      Action: 'lambda:InvokeFunction'
      FunctionName: !Ref DeployLambdafn
      Principal: s3.amazonaws.com
      SourceAccount: !Ref AWS::AccountId
Outputs:
  S3BucketName:
    Description: The name of the bucket created above
    Value: !Ref S3Trigger
Create the Stack
Two ways to create the stack:
– AWS Management Console
– AWS CLI
Create the stack via AWS Management Console
- Sign in to the AWS Management Console and search for CloudFormation.
- Click Create Stack
- Select the following options: Template is ready, Upload a template file, upload a template file
- Upload your file, you will see S3 url at the bottom of the screen. This will create a template bucket in S3 with the template file in it.
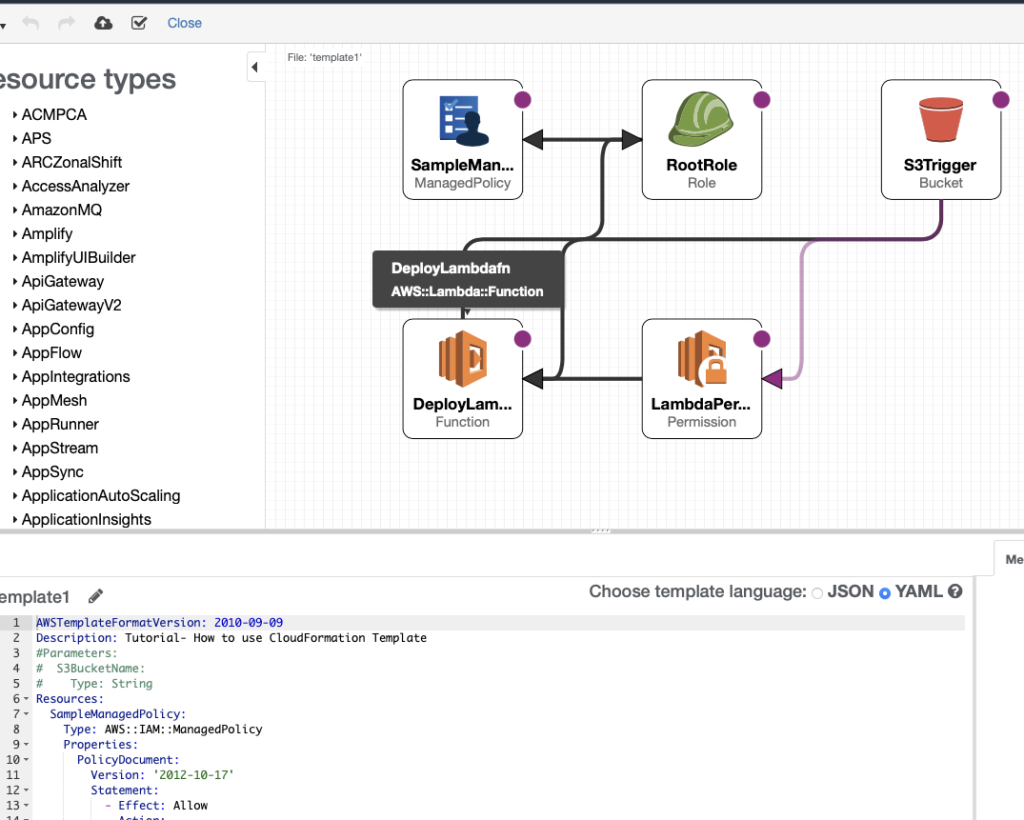
- To validate that your template is valid, you can also open the template in View in Designer. This is a good option to create and modify your template but that’s a topic for another tutorial. Close and return to the Create Stack page if all looks good.
- Provide a Stack name and click Next
- Keep the defaults in Create stack options and click Next.
- On the Review stack page, under Capabilities section, acknowledge as your template will be creating IAM resources and click Submit.
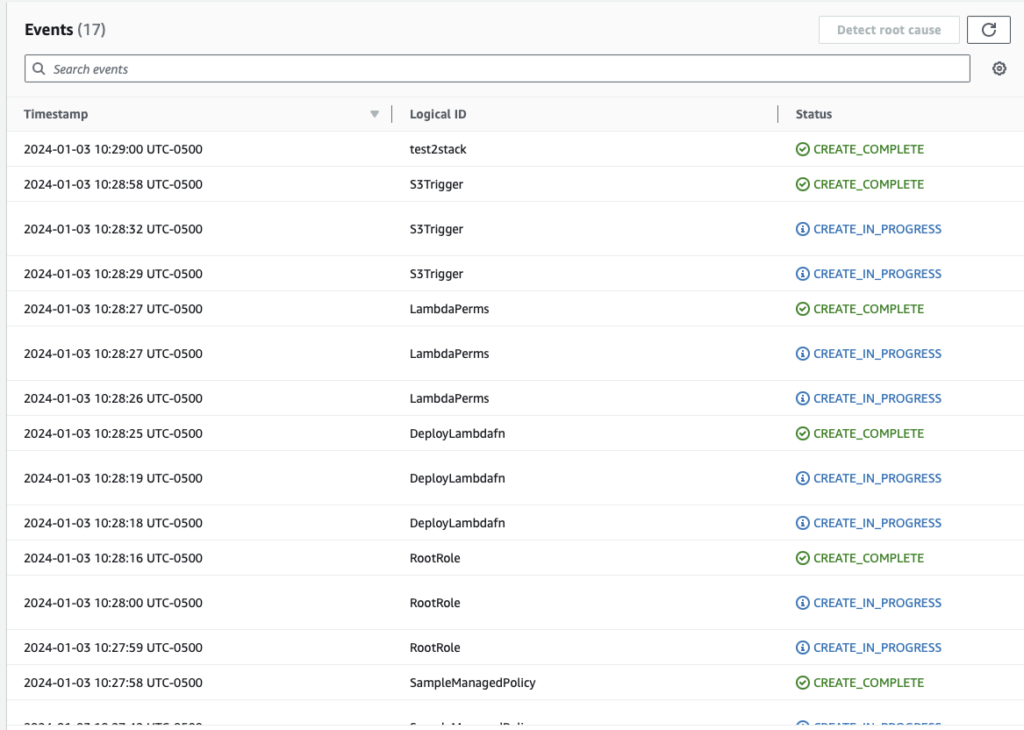
- In the events tab, you should see creation statuses for all the resources with CREATE_COMPLETE for your stack


Create the stack via AWS CLI
aws cloudformation create-stack --stack-name test2stack --template-body file://template --capabilities CAPABILITY_IAMOUTPUT:
{
"StackId": "arn:aws:cloudformation:us-east-1:111111222222:stack/test2stack/dc025330-a9c7-11ee-9dbb-1222e1fd621b"
}To see if the stack was created successfully, run the describe stacks command and notice the output values defined in the template. You may hav to run the command a few times until you see CREATE_COMPLETE status
aws cloudformation describe-stacksOUTPUT:
{
"Stacks": [
{
"StackId": "arn:aws:cloudformation:us-east-1:111111222222:stack/test2stack/a0bf92d0-aa4c-11ee-b5e6-0e5e8cfd4ae1",
"StackName": "test2stack",
"Description": "Tutorial- How to use CloudFormation Template",
"CreationTime": "2024-01-03T15:27:38.727000+00:00",
"RollbackConfiguration": {
"RollbackTriggers": []
},
"StackStatus": "CREATE_COMPLETE",
"DisableRollback": false,
"NotificationARNs": [],
"Capabilities": [
"CAPABILITY_IAM"
],
"Outputs": [
{
"OutputKey": "S3BucketName",
"OutputValue": "test2stack-s3trigger-5mvqtxnybmve",
"Description": "The name of the bucket created above"
}
],
"Tags": [],
"EnableTerminationProtection": false,
"DriftInformation": {
"StackDriftStatus": "NOT_CHECKED"
}
}
]
}To view resources created
aws cloudformation describe-stack-resource --stack-name test2stack --logical-resource-id DeployLambdafnOUTPUT:
{
"StackResourceDetail": {
"StackName": "test2stack",
"StackId": "arn:aws:cloudformation:us-east-1:111111222222:stack/test2stack/a0bf92d0-aa4c-11ee-b5e6-0e5e8cfd4ae1",
"LogicalResourceId": "DeployLambdafn",
"PhysicalResourceId": "test2stack-DeployLambdafn-h0C0XeNsc2kA",
"ResourceType": "AWS::Lambda::Function",
"LastUpdatedTimestamp": "2024-01-03T15:28:25.364000+00:00",
"ResourceStatus": "CREATE_COMPLETE",
"Metadata": "{}",
"DriftInformation": {
"StackResourceDriftStatus": "NOT_CHECKED"
}
}
}To view the Lambda function that was created. Note the function name to later look up the CloudWatch logs after you upload an object into the S3 bucket
aws lambda list-functionsOUTPUT:
{
"Functions": [
{
"FunctionName": "test2stack-DeployLambdafn-h0C0XeNsc2kA",
"FunctionArn": "arn:aws:lambda:us-east-1:111111222222:function:test2stack-DeployLambdafn-h0C0XeNsc2kA",
"Runtime": "python3.11",
"Role": "arn:aws:iam::111111222222:role/test2stack-RootRole-u8yLyd77vTv2",
"Handler": "test.lambda_handler",
"CodeSize": 2942,
"Description": "test my lambda function",
"Timeout": 3,
"MemorySize": 128,
"LastModified": "2024-01-02T22:43:04.080+0000",
"CodeSha256": "3n2cKsIK42Xi9NH//LP8fp9yz3GQ9U9SDYTg2Y7fDzs=",
"Version": "$LATEST",
"TracingConfig": {
"Mode": "Active"
},
"RevisionId": "3a6fe279-4650-47ff-bd68-12d3ab102545",
"PackageType": "Zip",
"Architectures": [
"x86_64"
],
"EphemeralStorage": {
"Size": 512
},
"SnapStart": {
"ApplyOn": "None",
"OptimizationStatus": "Off"
},
"LoggingConfig": {
"LogFormat": "Text",
"LogGroup": "/aws/lambda/test2stack-DeployLambdafn-h0C0XeNsc2kA"
}
}
]
}Invoke the Lambda function with the Amazon S3 trigger
Two ways to invoke the Lambda function with the S3 trigger:
– AWS Management Console
– AWS CLI
Invoke the Lambda function via the AWS Management Console
- Sign in to the AWS Management Console and search for S3.
- Upload the vacation.jpg file in the newly created bucket ‘test2stack-s3trigger-5mvqtxnybmve’
Invoke the Lambda function via the AWS CLI
aws s3api put-object --bucket test2stack-s3trigger-5mvqtxnybmve --key vacation.jpg --body vacation.jpgOUTPUT:
{
"ETag": "\"95253d1d6618a616babc6905c57b968f\"",
"ServerSideEncryption": "AES256"
}Verify correct operation using CloudWatch Logs
Two ways to view the CloudWatch logs:
– AWS Management Console
– AWS CLI
CloudWatch Logs via the AWS Management Console
- Sign in to the AWS Management Console and search for CloudWatch.
- Select LogGroups on the left
- You will notice one log group was created when you uploaded the file
- Click on the Log group and in details section, you will notice the Log streams at the bottom of the page
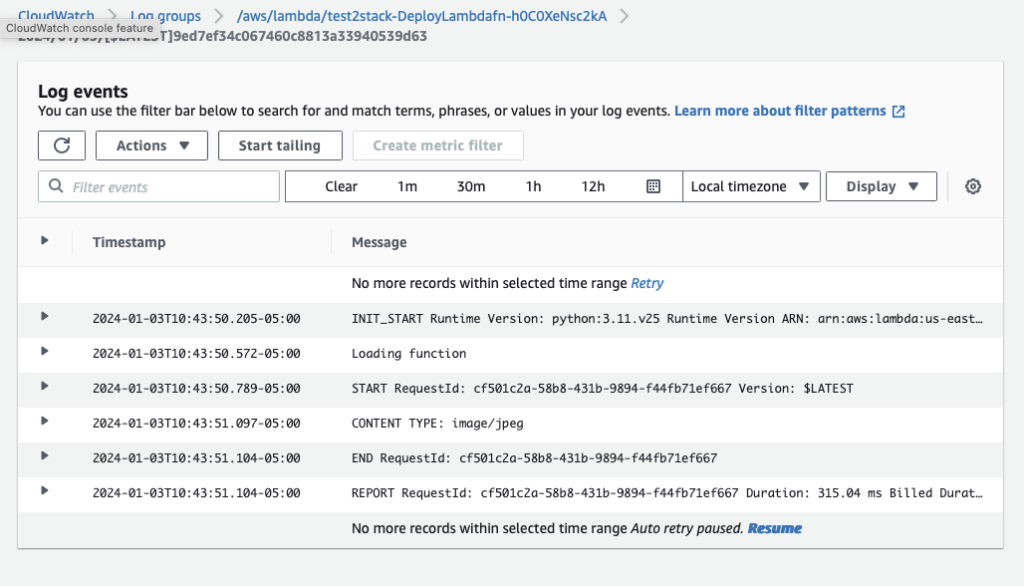
- Click the Log stream and you will see the details showing successful execution of your lambda function


CloudWatch Logs via the AWS CLI
View the CloudWatch logs to validate the Lambda function executed successfully. Replace the log_group with your Lambda function name. Note the Content Type
LOG_GROUP=/aws/lambda/test2stack-DeployLambdafn-h0C0XeNsc2kA
LOG_STREAM=`aws logs describe-log-streams --log-group-name $LOG_GROUP --max-items 1 --order-by LastEventTime --descending --query logStreams[].logStreamName --output text | head -n 1`
aws logs get-log-events –log-group-name $LOG_GROUP –log-stream-name $LOG_STREAM –query events[].message –output text
OUTPUT:
INIT_START Runtime Version: python:3.11.v25     Runtime Version ARN: arn:aws:lambda:us-east-1::runtime:a3304f2b48f740276b97ad9c52a9cc36a0bd9b44fecf74d0f1416aafb74e92fc
        Loading function
        START RequestId: 690275f5-5413-4b4c-b560-8d0b19d5d11c Version: $LATEST
        CONTENT TYPE: image/jpeg
        END RequestId: 690275f5-5413-4b4c-b560-8d0b19d5d11c
        REPORT RequestId: 690275f5-5413-4b4c-b560-8d0b19d5d11c  Duration: 299.11 ms     Billed Duration: 300 ms Memory Size: 128 MB         Max Memory Used: 83 MB  Init Duration: 458.82 ms
XRAY TraceId: 1-65949531-68b969ac3a8a0f815a4f03d2       SegmentId: 46d42794126d886c     Sampled: true
You can also run the following command for more verbose output
aws logs tail $LOG_GROUP —followOUTPUT:
2024-01-02T22:58:58.155000+00:00 2024/01/02/[$LATEST]82da857ea9d940bba645911e513a27c8 INIT_START Runtime Version: python:3.11.v25 Runtime Version ARN: arn:aws:lambda:us-east-1::runtime:a3304f2b48f740276b97ad9c52a9cc36a0bd9b44fecf74d0f1416aafb74e92fc
2024-01-02T22:58:58.448000+00:00 2024/01/02/[$LATEST]82da857ea9d940bba645911e513a27c8 Loading function
2024-01-02T22:58:58.615000+00:00 2024/01/02/[$LATEST]82da857ea9d940bba645911e513a27c8 START RequestId: 690275f5-5413-4b4c-b560-8d0b19d5d11c Version: $LATEST
2024-01-02T22:58:58.912000+00:00 2024/01/02/[$LATEST]82da857ea9d940bba645911e513a27c8 CONTENT TYPE: image/jpeg
2024-01-02T22:58:58.914000+00:00 2024/01/02/[$LATEST]82da857ea9d940bba645911e513a27c8 END RequestId: 690275f5-5413-4b4c-b560-8d0b19d5d11c
2024-01-02T22:58:58.914000+00:00 2024/01/02/[$LATEST]82da857ea9d940bba645911e513a27c8 REPORT RequestId: 690275f5-5413-4b4c-b560-8d0b19d5d11c Duration: 299.11 ms Billed Duration: 300 ms Memory Size: 128 MB Max Memory Used: 83 MB Init Duration: 458.82 ms
XRAY TraceId: 1-65949531-68b969ac3a8a0f815a4f03d2 SegmentId: 46d42794126d886c Sampled: trueDelete the stack
Two ways to delete the stack:
– AWS Management Console
– AWS CLI
Delete the stack via AWS Management Console
- In the S3 console, empty the bucket by deleting the files. Deleting files is necessary otherwise the delete stack will fail as it cannot delete the bucket if it has files.
- In the CloudFormation console, select the stack and click Delete

Delete the stack via AWS Management Console
- Delete the files in the S3 bucket. Deleting files is necessary otherwise the delete stack will fail as it cannot delete the bucket if it has files.
aws s3 rm s3://test2stack-s3trigger-5mvqtxnybmve/vacation.jpg- Delete the stack
aws cloudformation delete-stack --stack-name test2stack- Validate if the stack was deleted successfully
Deleted stacks don’t show up in the DescribeStacks operation if the deletion has been completed successfully.
aws cloudformation describe-stacksOUTPUT:
{
"Stacks": []
}When you list the lambda functions, it should show empty
aws lambda list-functionsOUTPUT:
{
"Functions": []
}Well that’s the end of the tutorial. Hope you got something out of it.
References:
- https://docs.aws.amazon.com/AWSCloudFormation/latest/UserGuide/gettingstarted.templatebasics.html
- https://docs.aws.amazon.com/AWSCloudFormation/latest/UserGuide/GettingStarted.Walkthrough.html
- https://aws-quickstart.github.io/templates-examples.html
- https://repost.aws/knowledge-center/cloudformation-attach-managed-policy
- https://docs.aws.amazon.com/AWSCloudFormation/latest/UserGuide/aws-resource-lambda-function.html
- https://docs.aws.amazon.com/cli/latest/reference/cloudformation/#cli-aws-cloudformation
