In this tutorial, you will learn how to set up your AWS account and development environment on a macOS with Visual Studio Code using AWS SDK and AWS CLI. This will allow you to interact with your AWS account and programmatically provision any resources you need.
- Create a new AWS account
- Configure a new user in IAM Identity Center
- Install Python
- Install Visual Studio Code
- install Python extension for VS code
- install AWS toolkit extension for VS code
- Set up the AWS CLI
- Set up AWS SDK (boto3 for python)
- S3 Code Examples
Note: Follow the instructions in the order below as there are dependencies. For example, to use Boto3, you first need to install Python and AWS CLI.
Create a new AWS account
Sign up for AWS account on the aws website at https://aws.amazon.com/
When signing up, sign up for the Basic Support which is free of charge. You can always change support tiers at a later date.
When you create an AWS account, a root user is created automatically for your account. The root user is a special entity that has full access to the account, and can perform all actions, including changing the payment methods or closing the account. When you sign-in using the root user you have complete access to all AWS service and resources in the account. Due to this level of permissions,
- Enable additional security for the root user with multi-factor authentication (MFA). I set up MFA in IAM and used Google Authenticator App on my mobile phone.
- Set up additional users to perform daily tasks related to your account.
Configure Users
After establishing the root user account, I created a separate admin user account in IAM Identity Center and also enabled MFA for this account.
Follow the detailed instructions here https://aws.amazon.com/getting-started/guides/setup-environment/.
Important: Each AWS Organization has a unique access portal URL. Make sure you keep a record of it with your user sign-in information, the Start URL typically looks like
https://<your url>.awsapps.com/start/Install a Python interpreter
For the development setup, install a package manager system like Homebrew as the system install of Python on macOS is not supported. To install Python using Homebrew on macOS use brew install python3 at the Terminal prompt.
brew install python3Once Python is installed, run python3 –version in the command line and see the following output (version may be different):
python3 --version
Python 3.11.6
Install Visual Studio Code
- Download Visual Studio Code for macOS.
- Open the browser’s download list and locate the downloaded app or archive.
- If archive, extract the archive contents. Use double-click for some browsers or select the ‘magnifying glass’ icon with Safari.
- Drag Visual Studio Code.app to the Applications folder, making it available in the macOS Launchpad.
- Open VS Code from the Applications folder, by double clicking the icon.
- Add VS Code to your Dock by right-clicking on the icon, located in the Dock, to bring up the context menu and choosing Options, Keep in Dock.
Install Python extension for Visual Studio Code
You can download, install, and set up the Python for Visual Studio Code through the VS Code Marketplace in your IDE.
- Click the extensions button on the left navigation bar and then in the Search Extensions in Marketplace, enter python.
- Choose Install to begin the installation process.
Install AWS Toolkit for Visual Studio Code
You can download, install, and set up the AWS Toolkit for Visual Studio Code through the VS Code Marketplace in your IDE.
- Click the extensions button on the left navigation bar and then in the Search Extensions in Marketplace, enter aws toolkit.
- From the AWS Toolkit for Visual Studio Code extension in the VS Code Marketplace, choose Install to begin the installation process.
- Restart VS Code to complete the installation process.
Connect AWS Toolkit to IAM Identity Center
This process launches your IAM Identity Center portal in your preferred web browser.
- From VS Code, open the command pallet by pressing Shift+Command+P (Ctrl+Shift+P Windows), enter AWS: Add a New Connection into the search field, then select it to open the Connect to AWS new connection User interface (UI).
- From the Connect to AWS new connection UI, choose AWS Explorer.
- From the AWS Explorer view, enter the URL for your IAM Identity Center portal into the Start URL field and select the AWS Region that’s associated with your IAM Identity Center credentials.
- Choose Sign in and confirm that you want to open the IAM Identity Center portal in your preferred browser.
- Follow the instructions in your web browser to continue, you’re notified that it’s safe to close your browser and return to VS Code when the process is complete.

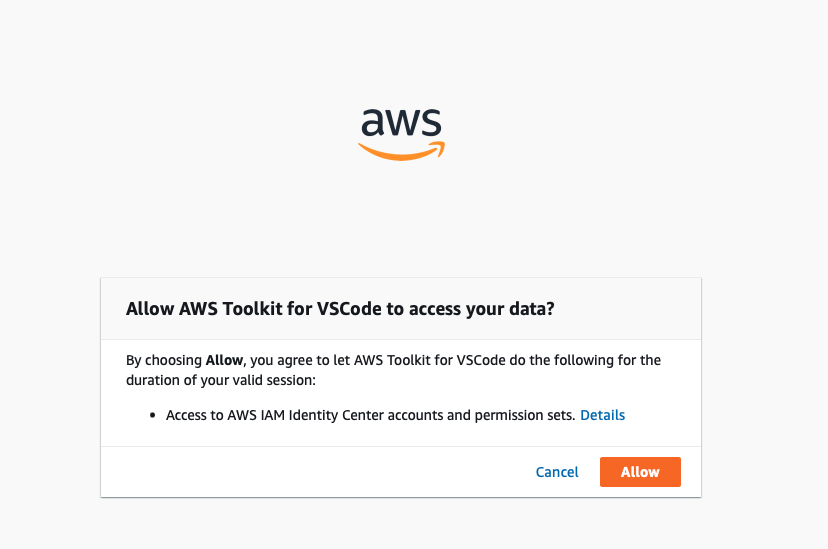
AWS Toolkit for VSCode can now access your data.
You can close this window and start using AWS Toolkit for VSCode.
Authenticate with IAM Identity Center credentials
- Expand the AWS Explorer, then choose Select IAM Credentials to View Resources to open the Switch Connection dialog.
- Choose the IAM Identity Center credentials you want to authenticate with from the list.
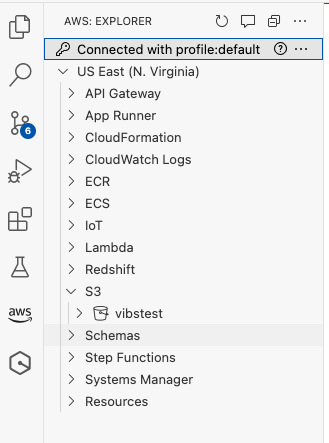
- The Switch Connection dialog automatically closes and the AWS Explorer is updated with your AWS resources when the process is complete.
AWS Explorer
AWS Explorer is the main navigation pane for the AWS Toolkit. Your AWS services and resources are available through the AWS Explorer and are organized by region.
- From your AWS Explorer, choose the EXPLORER menu heading to expand the Region selector navigation pane.
- Choose a region to expand a list of your AWS services associated with that region.
- Choose an AWS service to view its associated features and resources.

Set up AWS CLI
The AWS CLI is a unified tool to manage your AWS services from the command line and automate them through scripts. To install AWS CLI, follow the instructions here https://docs.aws.amazon.com/cli/latest/userguide/getting-started-install.html
Once the AWS CLI is installed, you can run aws –version in your command line and see the following output (version may be different):
aws --version
aws-cli/2.15.3 Python/3.11.6 Darwin/21.6.0 exe/x86_64 prompt/off
The AWS CLI is now installed and to interact with AWS using the CLI, you need to configure credentials for it to use when making API calls.
Configure Credentials
To configure the credentials, use the command <aws configure sso> to include the credentials of the user created
aws configure ssoThe CLI attempts to automatically open the SSO authorization page in your default browser and begins the sign in process for your IAM Identity Center account.
Attempting to automatically open the SSO authorization page in your default browser.
If the browser does not open or you wish to use a different device to authorize this request, open the following URL:

https://device.sso.us-east-1.amazonaws.com/

Then enter the code:
XXXX-XXXX
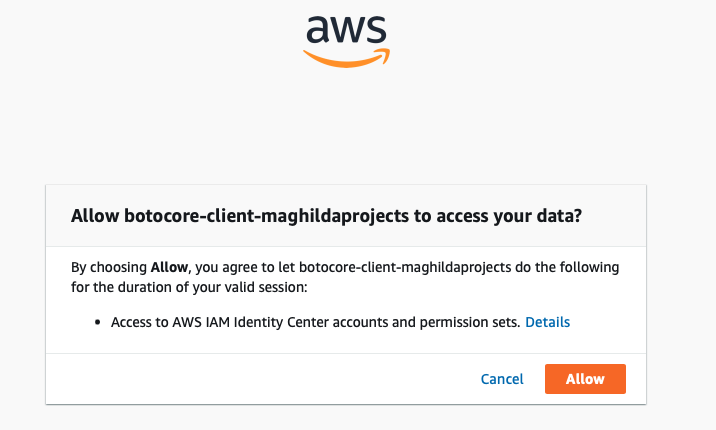
After providing your password and MFA credential you are asked to allow access to your data. This gives permissions to the AWS CLI to retrieve and display the AWS accounts and roles that you are authorized to use with IAM Identity Center.

Select Allow. After authentication, you will be told that you can close the window.
botocore-client-maghildaprojects can now access your data.
You can close this window and start using botocore-client-maghildaprojects.
The CLI will update and show you the AWS accounts and roles that are available to you.
Validate Credentials
Because you have only set up one AWS account with the AdministratorAccess role at this point that is the account and role you are signed in with. Your CLI window should now have these lines displayed:
The only AWS account available to you is: 111111222222
Using the account ID 111111222222
The only role available to you is: AdministratorAccess
Using the role name "AdministratorAccess"
You are then asked to Specify the default output format, the default AWS Region to send commands to, and to provide a name for the profile so you can reference this profile when running commands in the CLI.
Select the default options by pressing enter. You will have the following:
CLI default client Region [us-east-1]:
CLI default output format [None]:
CLI profile name [AdministratorAccess-111111222222]:
To use this profile when running commands, specify the profile name using –profile.
The config file is located at ~/.aws/config on computers running Linux or macOS. If you open your config file, you will see these two sections:
$ cat ~/.aws/config
[profile AdministratorAccess-111111222222]
sso_session = maghildaprojects
sso_account_id = 111111222222
sso_role_name = AdministratorAccess
region = us-east-1
[sso-session maghildaprojects]
sso_start_url = https://<your url>.awsapps.com/start/
sso_region = us-east-1
sso_registration_scopes = sso:account:access
Test the Configuration
Now, run the <aws ec2 describe-vpcs> command to check if the configuration is correct. Each new AWS account has default VPCs configured so you can run this command without having any other services configured on your AWS account.
aws ec2 describe-vpcs --profile AdministratorAccess-111111222222
{
    "Vpcs": [
        {
            "CidrBlock": "172.02.0.0/16",
            "DhcpOptionsId": "dopt-0d924a643535f4",
            "State": "available",
            "VpcId": "vpc-08f33e37684",
            "OwnerId": "111111222222",
            "InstanceTenancy": "default",
            "CidrBlockAssociationSet": [
                {
                    "AssociationId": "vpc-cidr-assoc-015345345839aca",
                    "CidrBlock": "172.02.0.0/16",
                    "CidrBlockState": {
                        "State": "associated"
                    }
                }
            ],
            "IsDefault": true
        }
    ]
}
This confirms that your AWS CLI has now been set up correctly.
You can now use sso-session and profile to request credentials using the <aws sso login> command.
aws sso login --profile AdministratorAccess-111111222222Attempting to automatically open the SSO authorization page in your default browser.
If the browser does not open or you wish to use a different device to authorize this request, open the following URL:
https://device.sso.us-east-1.amazonaws.com/
Then enter the code:
XXXX-XXXXNavigate to the browser window and allow access to your data. When you return to the CLI window the following message has this line displayed:
Successfully logged into Start URL: https://<your url>.awsapps.com/start/Session Lifetime
The session expires depending on the session duration set in the Permission Set settings for the account (default is 1 hour). When the session has expired and you are trying to run the S3 command, following error message is displayed in the terminal.
aws s3 ls --profile AdministratorAccess-111111222222
An error occurred (ExpiredToken) when calling the ListBuckets operation: The provided token has expired.
To login again and get the latest access keys and session tokens, run the following command
aws sso login --profile AdministratorAccess-111111222222Now, when you run the S3 command again, you will receive the response
aws s3 ls --profile AdministratorAccess-111111222222
2023-12-22 17:27:17 vibstest
To force a logout before session timeout, run the aws sso logout command
aws sso logout
aws s3 ls --profile AdministratorAccess-111111222222
Error loading SSO Token: Token for maghildaprojects does not exist
AWS SDK for Python (Boto3)
Boto3 is the AWS SDK for Python. Boto3 makes it easy to integrate your Python application, library, or script with AWS services including Amazon S3, Amazon EC2, Amazon DynamoDB, and more.
To install Boto3, in your command line, run
pip3 install boto3After boto3 is installed successfully, you have to populate the credentials file with the access key and session token, for programmatic access to AWS services and resources from your development environment.
- Login to your AWS access portal URL (Start URL)
- Select AWS Account and click Command line or programmatic access
- Select Option 2 and copy paste into your credentials file and save
- Run the S3 Python code example in the following section
Option 2: Manually add a profile to your AWS credentials file (Short-term credentials)
Paste the following text in your AWS credentials file (typically located in ~/.aws/credentials).

[111111222222_AdministratorAccess]
aws_access_key_id=AJD3QMQ4FEGHSFDHXDZPV
aws_secret_access_key=ggggjhbjhbjhbhjxeserer///////cyvuyby==
aws_session_token=IQoJb3JpZ2luX2VjEMf//////////==
S3 Python code example
This section describes how to use the AWS SDK for Python to perform common operations on S3 buckets.
Create a python file and copy the code below.
Make sure to delete the bucket and any other resources you created for this tutorial.
msg = "Hello! This is a simple S3 tutorial using Python"
print(msg)

import boto3

bucket_name = 'vibstest'
s3 = boto3.client('s3')

# Retrieve the list of existing buckets
response = s3.list_buckets()

if not response['Buckets']:
    print('bucket doesn't exist. create bucket.’)
    # Create bucket
    response = s3.create_bucket(Bucket=bucket_name)
    print(response)
else:
    # Output the bucket names
    print('Existing buckets:')
    for bucket in response['Buckets']:
        bucket_name = bucket["Name"]
        print(f'  {bucket_name}')
        print(f'  {bucket["CreationDate"]}')
Run the python code and you will see the below output in the terminal. The HTTPStatusCode is 200.
Hello! This is a simple S3 tutorial using Python
There are no buckets. Create bucket.
{'ResponseMetadata': {'RequestId': 'VBCK0M4686T3', 'HostId': 'gAKr4ESkgufutjyjguk,kjoll0kklj0jkhkCsULNrpHacAHGJST0=', 'HTTPStatusCode': 200, 'HTTPHeaders': {'x-amz-id-2': 'gAKr4ESDUGJjfgyjfyjfjgkj+o2CkZOdTlVCCo3JOIkhkugkgHacAKqVOT0=', 'x-amz-request-id': 'VBCK0M4KHD3T3', 'date': 'Tue, 12 Dec 2023 10:40:23 GMT', 'location': '/vibstest', 'server': 'AmazonS3', 'content-length': '0'}, 'RetryAttempts': 0}, 'Location': '/vibstest'}
When you run the program again, you will see the below output in the terminal
Hello! This is a simple S3 tutorial using Python
Existing buckets:
  vibstest
  2023-12-11 07:27:17+00:00
Delete the bucket
import boto3

# Delete the bucket
response = s3.delete_bucket(Bucket=bucket_name)
print(response)
print('deleted')
You will see the below output in the terminal with the HttpStatusCode of 204
{'ResponseMetadata': {'RequestId': 'VBCDDGHRDHHD775996G', 'HostId': 'SPb8tMpY9hQlsC7NjTn6igphderfghrDKDDFSv5GtRaCjvZTRT0VopZdtOs5Yy3bJYcR2Tvs=', 'HTTPStatusCode': 204, 'HTTPHeaders': {'x-amz-id-2': 'SPb8tMpY9hQlsC7NjTjkehffkerfjkefqYbggFSv5GtRaCjvZTRT0VopZdtOs5Yy3bJYcR2Tvs=', 'x-amz-request-id': 'VBCZHHDHSFLP96G', 'date': 'Tue, 12 Dec 2023 10:40:23 GMT', 'server': 'AmazonS3'}, 'RetryAttempts': 0}}
deleted
This is the end of the Setting Up Your AWS Environment tutorial. Hopefully, you got something out of it. Below are references for additional instructions and HOWTO’s.
References:
- https://aws.amazon.com/getting-started/guides/setup-environment/
- https://docs.aws.amazon.com/IAM/latest/UserGuide/root-user-tasks.html
- https://docs.aws.amazon.com/cli/latest/userguide/getting-started-install.html
- https://docs.aws.amazon.com/toolkit-for-vscode/latest/userguide/setup-toolkit.html
- https://docs.aws.amazon.com/sdkref/latest/guide/access-sso.html
- https://docs.aws.amazon.com/sdkref/latest/guide/access.html
- https://docs.aws.amazon.com/cli/latest/userguide/cli-configure-envvars.html?icmpid=docs_sso_user_portal
- https://code.visualstudio.com/docs/python/python-tutorial
- https://aws.amazon.com/sdk-for-python/
- https://code.visualstudio.com/docs/python/python-tutorial
- https://docs.aws.amazon.com/cli/latest/userguide/cli-configure-sso.html
- https://docs.aws.amazon.com/singlesignon/latest/userguide/howtosessionduration.html
